
N6TV - Red Pitaya Combine CW & RTTY Skimmer & HDSDR
(These posts originally appeared in the SkimmerTalk reflector, but have been edited and updated with current information and links. Last updated by N6TV 2017-07-31 23:26 UTC).
From: Bob Wilson, N6TV <n6tv@arrl.net>
Date: Sun, Jul 23, 2017 at 11:48 PM
Subject: New info. about running Skimmer using the latest 0.97 Red Pitaya OS
To: SkimmerTalk Reflector <skimmertalk@contesting.com>
- Ignore my previous warnings. All Red Pitaya's shipping with OS v0.97 actually do install and run Pavel Demin's SDR Receiver compatible with HPSDR (0.94) just fine using the built-in web installer. But you must modify /etc/rc.local to get it to start automatically at boot time.
- For RTTY Skimming on Windows 7 or later, ignore "C:\Program Files (x86)\Afreet\RttySkimServ\RttySkimServ.ini" (if any). Instead, edit "%appdata%\Afreet\Products\RttySkimServ\RttySkimServ.ini" to match center frequencies, segments, and FreqCalibration used by CW Skimmer Server.
- To run HDSDR while skimming, you have to install IPP51 and vcredist_86.exe in addition to CWSL_Tee
- Use a 5V fan to keep it cool
- The root password is not retained between power cycles
- The clock is not set automatically at power-up
- A RAM disk used, so any changes or logs written to the local file system disappear between power cycles
- There is no easy way to install useful software tools using the handy "apt-get" command (e.g. apt-get install dos2unix)
- The command prompt doesn't display the standard hostname (rp-XXYYZZ) or the current working directory name
- Power up the Red Pitaya using the microSD card image shipped with new units. If you already wiped it out, you can recreate it by following all the steps here. I've tried both "Stable" and "Beta" 0.97 operating systems, and they both work.
- Determine the IP address assigned to the Red Pitaya. From Windows, the command ping rp-XXYYZZ may reveal it, where XXYYZZ represents the last six digits of the MAC address printed on the Red Pitaya's Ethernet connector. Your router will also display the assigned IP address, or the Windows command arp -a may as well.
- Open a web browser and go to http://192.168.1.xx (use whatever IP address was assigned to your Red Pitaya by your Router)
- Click on the green Application marketplace icon
- Scroll down to the SDR Receiver compatible with HPSDR (not the other receiver), and click Install
- It should finish installing in less than 30 seconds, then click Run
- At this point as long as you don't close the web page that opens after you click Run, you can start your Skimmer Server software and it should find the Red Pitaya (use the 17.7.6 HermesIntf.dll as described in my original post below)
- Exit Skimmer Server and close your web browser (in that order). This will terminate the receiver.
- Install Putty for Windows and open an SSH connection (like a TELNET connection) to the Red Pitaya's IP address.
Userid: root
Password: root
- You should see a login message at the very top that says:
Welcome to Ubuntu 16.04.2 LTS (GNU/Linux 4.4.0-xilinx armv7l)
or similar
- If you haven't done so already, change the root password using the command:
passwd
- Enter the following five Unix commands in sequence (updated 2017-07-31):
cd /etc
mv rc.local rc.local.old
wget http://www.kkn.net/~n6tv/rc.local
chmod +x rc.local
nano rc.local
(Verify the file's contents match what I've documented above. Press Ctrl-X to exit the nano editor.)
reboot
- Download
https://sites.google.com/site/hansdorn/pics/xadc.tgz
using a web browser (the wget commmand doesn't work)
- Copy xadc.tgz to the Red Pitaya. On Windows (when Putty installed), use the command:
pscp -p xadc.tgz root@192.168.1.89:/tmp
(Substitute the IP address of your RP. Command will prompt for the root password)
- Open a putty session to the Red Pitaya, then issue the following commands, in order:
cd /tmp
gunzip xadc.tgz
tar xvf xadc.tar
export PATH="$PATH$:/tmp/xadc"
xadc_get_value_temp
From: Bob Wilson, N6TV <n6tv@arrl.net>
Date: Fri, Jun 30, 2017 at 10:40 PM
Subject: CW Skimmer + RTTY Skimmer running simultaneously on Red Pitaya - Success!
To: SkimmerTalk Reflector <skimmertalk@contesting.com>
- The only Red Pitaya OS version that worked for me was the Customized SD Card Image linked below (Update 2017-07-30: see new info. above). Do not waste time trying any other versions, such as the one that comes pre-installed on the Red Pitaya micro SD card, even though it's newer, or version 0.94 on the Red Pitaya web site (Update 2017-07-30: these are acutally OK)
- As discovered by K1TTT, use a single jumper to bypass the 1M ohm input impedance circuit. Connect pins 2 and 5 (the two middle pins) together (pictures in W2NAF's doc linked below)
- I'm using a tiny 14:1 transformer supplied by Red Pitaya on the input. At this time they are not planning to sell it separately; it will only be supplied with their new transceiver kit. It is a MiniCircuits model T14-1+ mounted on a small PC board with male and female SMA connectors.
- I found a 10 dB preamp to be helpful on the high bands with my antenna. Without it, I saw no change in noise floor when I disconnected the antenna on the high bands. It was very nice to watch the noise floor in HDSDR.
- Configuration: VE3DO Loop Antenna -> DX Engineering Receiver Guard -> 10 dB Pre-Amp -> 14:1 transformer -> Red Pitaya Input 1.
- I recommend a short BNC to SMA pigtail, rather than a BNC to SMA adapter, to reduce strain on the SMA connector. One example is the JetStream JT4130J3 sold by GigaParts.
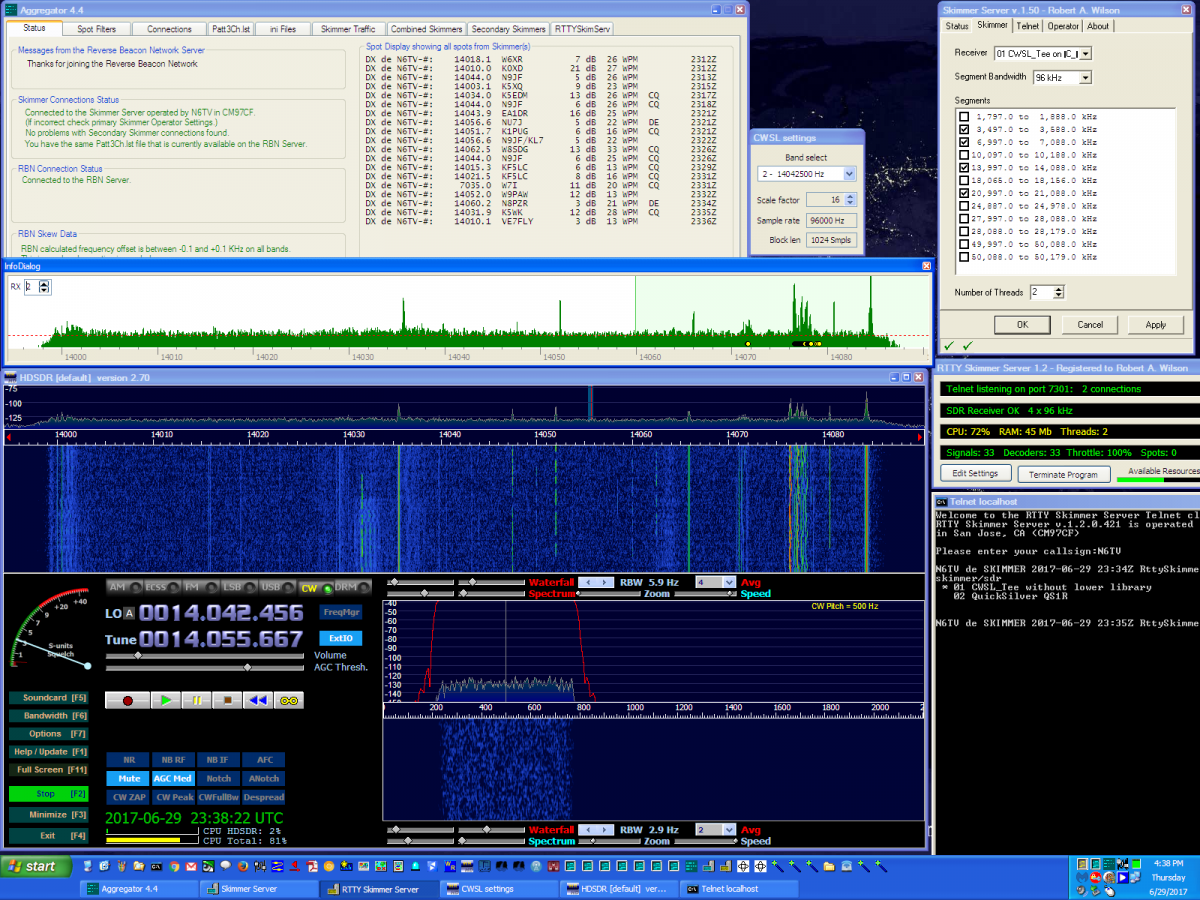
- Copy CWSL_Tee.dll to the SkimSrv installation directory
- Copy CWSL_Tee.dll to the RttySkimServ installation directory
- Copy HermesIntf.dll to the SkimSrv installation directory
- Do NOT (repeat, do NOT) copy HermesIntf.dll to the RttySkimServ directory, otherwise everything stops when you try to start RTTY Skimmer Server after CW Skimmer Server
- Create a two-line file named CWSL_Tee.cfg containing only these two lines and nothing more:
HermesIntf
64
- Save CWSL_Tee.cfg in the SkimSrv directory
- Copy CWSL_Tee.cfg to the RTTYSkimServ directory
- Copy CWSL_Tee.cfg to the RBN Aggregator directory (a very important step)
- Copy ExtIO_CWSL.dll to the HDSDR installation directory, nothing more
- Just as for the QS1R, configure both SkimSrv/SkimSrv.ini and RttySkimServ/RTTYSkimServ.ini with identical values for the following lines:
(mostly left blank below, for clarity):
DeviceName=01 CWSL_Tee on
FreqCalibration=1
CenterFreqs48=
CenterFreqs96=
CenterFreqs192=
SegmentSel48=
SegmentSel96=
SegmentSel192=
Rate=1 - In SkimSrv.ini use:
[Telnet]
Port=7300
In RTTYSkimServ.ini use:
[Telnet]
Port=7301
(value not critical, but the two skimmers must not be using the same TELNET port) - Manually start CW Skimmer Server first
- If necessary, select the SDR named "01 CWSL_Tee on ..." and verify normal operation. If the device name displays strange characters, it means you are using an outdated version of HermesIntf.dll (a fix was made available by K3IT on 2017-07-06)
- Manually start RTTY Skimmer Server second
- Verify that both skimmers are still running and show no errors or warning messages.
If you get errors, note them and immediately terminate both skimmer programs.
Look at the CWSL_Tee and HermesIntf log files written to both directories to help identify the problem - (optional) Start HDSDR and select ExtIO_CWSL.dll when prompted
- In HDSDR, use only the small pull-down menu in the ExtIO pop-up dialog to change bands. You can listen to any band being monitored by the Skimmers. Do not change the LO frequency, only the TUNE frequency (just click on the spectrum or waterfall)
- Terminate HDSDR, RTTY Skimmer Server, and CW Skimmer Server, in that order
- Launch the RBN Aggregator and quickly click on the ini Files tab and select Stop Rotation
- Check the path and file names make sure you're launching SkimSrv.exe, and the same SkimSrv.ini file edited previously. View the file with the Edit button to verify.
- On the Secondary Skimmers tab, last slot (#8), select IP address 127.0.0.1 port 7301 or whatever you used in RttySkimServ.ini
- On the RttySkimServ tab, verify the full path to RttySkimServ.exe and RttySkimServ.ini - do not use any other file name here.
- Check the box Force RTTY Skimmer Server to follow CW Skimmer Server
- Go back to the ini Files tab and click the NOW button next to the proper SkimSrv.ini to launch both skimmers, in order.
- Verify that both Skimmer Servers start up normally with no errors, and show one telnet connection each.
- In the Skimmer Traffic tab of the Aggregator, you should see messages indicating telnet connections to both CW Skimmer and RTTY Skimmer
- In the Status tab, there should be no errors
- If you do have errors, look for HermesIntf and CWSL_Tee log files in the Aggregator directory. The most common problem is not having the correct CWSL_Tee.cfg file in the Aggregator directory.
- Creating a 6-Band RBN Receiver Using a Red Pitaya by W2NAF (good pictures showing where to move the jumper)
- Customized Red Pitaya SD Card Image File by Pavel Demin
- CWSL_Tee.zip by Petr Parýzek - see complete Installation Instructions
- IPP51.zip - Intel Integrated Primitives Library required by CWSL_Tee
- vcredist_x86.exe - Microsoft C runtime library required by CWSL_Tee
- HermesIntf-17.7.6.zip by Vasiliy Gokoyev, K3IT
- Running-RTTYSkimServer-and-CW-SkimServer.pdf by N4ZR
- RBN Aggregator 4.4 by W3OA
- HDSDR 2.76 by DG0JBJ
- CW Skimmer Server 1.5 by VE3NEA
- RTTY Skimmer Server 1.2 by VE3NEA
- OmniRig by VE3NEA (optional)
- Putty SSH Client for Windows, developed and supported by various volunteers
- Preparing a Red Pitaya SD Card (not required unless you want to restore the SD image that came pre-installed, using the Win32 Disk Imager)
- We all owe Pavel Demin a big THANK YOU for his Red Pitaya SDR Receiver.
- Follow the steps in W2NAF's excellent Red Pitaya RBN How-To Guide exactly; don't take any shortcuts:
- The Red Pitaya Starter kit includes a new and improved v0.97 operating system, which boots fine and has handy features, but I have not been able to find a binary version of Pavel Demin's HPSDR code that runs on it (Update: 2017-07-30 - it works fine, see note of July 23rd above).
- For now, use only the v0.95 ecosystem Zip image linked above (Update 2017-07-30 - the v0.97 Ubuntu image is now preferred).
- Insert the micro SD card and adapter included with the Red Pitaya Start Kit into your Windows computer, format the FAT partition (wiping out v0.97), then extract Pavel Demin's entire SD Card Image to the root directory.
- You can get back to a vanilla v0.97 later using images on the Red Pitaya web site .
- Leave the other hidden partitions on the 4GB micro SD card alone, just format the FAT partition, do not delete or touch any other partitions.
- Extracting the Zip without first formatting the partition does not work.
- Installing the v0.94 SDR receiver from the "Marketplace" link instead of from the Zip image does not work.
- You don't have to use PowerSDR, which I found very hard to use. HDSDR seems much more intuitive to me.
- You do not need to install Bonjour to access the Red Pitaya box from Windows; use the Windows command arp -a or your Router interface to find the IP address assigned to the Red Pitaya, then open your browser and enter that IP address as a URL
- Just use FreqCalibration=1 in the Skimmer .ini files. I wasted a lot of time trying to get just the right calibration setting on the highest band, but then it messed up the other bands. Frequency calibration is not consistently "high" or "low" from band to band due varying sampling conversions, and since the Skimmer provides only one calibration setting, it's best to leave it alone. (Update 2017-07-30: once the temperature is stabilized with a fan, the FreqCalibration procedure works well. Set the value to Displayed Frequency / True Frequency, with 8 digits after the decimal point.)
- Frequency accuracy got better when I added a small 30mm fan via the plastic case, as recommended. I did have to crimp on my own 0.1 mm fan connector. Not well indicated on the board is that the positive pin of the fan connector is the pin closest to the center of the board.
- You can calibrate HDSDR very accurately using Options | Calibration Settings while tuned to WWV in EECS (AM) mode with AFC enabled.
- With OmniRig support, HDSDR can follow your transceiver's VFO and vice versa (Options -> CAT to radio (Omni-Rig) -> sync from Omni-rig (enable), sync to Omni-Rig (enable)
- Use Putty on Windows to get Unix command line access to the Red Pityaa (userid root, password root).
- Use the Unix command rdate -sp wwv.nist.gov to accurately set the internal Red Pitaya clock (in UTC) after power up. Any error logs produced will then be properly time-stamped. Change the password first, then set the clock. It may not be possible to automate setting the clock via NTP on v0.95.
- Use the passwd command to change the root password. Unfortunately, the new password is not saved between power cycles in this version of the OS, so it must be reset every time you power up the Red Pitaya. It seems this version uses a RAMDISK, so changes made to local files are not saved between power cycles. :-(
- The top command will display the Red Pitaya CPU utilization and memory use. I never saw the CPU usage exceed 25% when skimming 6 bands at 192 kHz. Type q to exit and return to the command line.
- Type exit to exit from the Unix command line shell
- If you open the IP address of the Red Pitaya in your browser, you'll see a nice friendly interface with an "Application Marketplace" link, but that software is not pre-installed on the SD card, it just redirects to http://bazaar.redpitaya.com/, and the SDR Receiver v0.94 on that site is old and does not run at all on v0.95. DO NOT CLICK INSTALL! (Update 2017-07-30 -- this actually works fine; I misunderstood that you have to click Install, Run, and keep the next page open to run the SDR receiver manually).
- Despite W4KAZ's blog post (http://w4kaz.com/qth/?p=2786), the only SDR receiver build that seems to work with CW Skimmer Server and RTTY Skimmer Server at this time is 0.95 pre-built version. I think there are still outstanding issues preventing the SDR code from running on any new version of the OS. (Update 2017-07-30: all those problems were fixed).
- I tried SDR-Console and WINRAD but they are not compatible. Only HDSDR and PowerSDR worked for me, and only HDSDR works when the Skimmers are running.
- The monitor -ams command is documented to display Red Pitaya CPU temperature, but it isn't implemented in v0.95. :-(
- Error messages in the Red Pitaya are saved in in /tmp/log/redpitaya_nginx (use the tab key to auto-complete long file names)
- Use nano filename to view a log file in a full screen Unix text editor
- Press Ctrl-X to exit the editor